The picture below is a typical picture uploaded to blogger through the post editor:
 If you mouse over the image, a little selector hand will appear which will allow you to open the full size version of the image. Annoying! To remove this option, follow the instructions below:
There are two tabs at the top of the post editor: "Edit Html" and "Compose". The "Edit Html" option allows you to edit the code of you're post. Select the "Edit Html" tab and locate that portion of the code applies to your picture. The applicable portion of the code for the image above, is as follows:
<a onblur=“try {parent.deselectBloggerImageGracefully();} catch(e) {}” href=“http://4.bp.blogspot.com/_6IF2BtrMoDs/R9YQkD-74aI/
AAAAAAAAAF4/Jt084qPh1Y8/s1600-h/IMG_2510.JPG”><img style=“margin: 0px auto 10px; display: block; text-align: center; cursor: pointer;” src=“http://4.bp.blogspot.com/_6IF2BtrMoDs/R9YQkD-74aI/
AAAAAAAAAF4/Jt084qPh1Y8/s400/IMG_2510.JPG” alt=““ id=“BLOGGER_PHOTO_ID_5176343033439576482” border=“0” /></a>
You're image name and folders will be different than those in the code shown above, so everything will not look exactly the same. The link-removal method, however, is the same for all posts. Simply edit the code as follows:
1. Remove all of the picture code before "<img"
2. Remove "cursor: pointer;" from the body of the code
3. Remove "</a>" from the end of the picture code
The portions which should be removed are shown in green below:
<a onblur=“try {parent.deselectBloggerImageGracefully();} catch(e) {}” href=“http://4.bp.blogspot.com/_6IF2BtrMoDs/R9YQkD-74aI/
AAAAAAAAAF4/Jt084qPh1Y8/s1600-h/IMG_2510.JPG”><img style=“margin: 0px auto 10px; display: block; text-align: center; cursor: pointer;” src=“http://4.bp.blogspot.com/_6IF2BtrMoDs/R9YQkD-74aI/
AAAAAAAAAF4/Jt084qPh1Y8/s400/IMG_2510.JPG” alt=““ id=“BLOGGER_PHOTO_ID_5176343033439576482” border=“0” /></a>
the remaining code should look something like this:
<img style=“margin: 0px auto 10px; display: block; text-align: center;” src=“http://4.bp.blogspot.com/_6IF2BtrMoDs/R9YQkD-74aI/
AAAAAAAAAF4/Jt084qPh1Y8/s400/IMG_2510.JPG” alt=““ id=“BLOGGER_PHOTO_ID_5176343033439576482” border=“0” />
The results of these modifications can be seen on the image below:
 Even after this work-around, a particularly snoopy visitor can still find the full sized image by opening another post with a linked picture, copying the link from the address bar and changing the filename to that of the desired picture. For example, if you click on the picture in my photostitch post, the full sized image will be opened in the current window and the following text will be displayed in the address bar.
http://4.bp.blogspot.com/_6IF2BtrMoDs/R8uoJOy2rfI/AAAAAAAAAFI/
nMxjewxpZbo/s1600-h/mini-stitched2c-1.JPG
That text reveals the location of the full sized images. By simply changing the filename at the end of the text (mini-stitched2c-1.JPG) to that of the desired photo (obtained by right clicking on the small image and selecting "properties"), which in the case used in this tutorial is IMG_2510.JPG, the result is the following text:
http://4.bp.blogspot.com/_6IF2BtrMoDs/R8uoJOy2rfI/AAAAAAAAAFI/
nMxjewxpZbo/s1600-h/IMG_2510.JPG
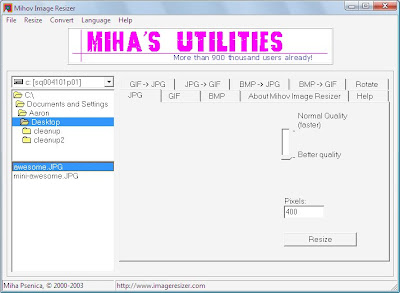
When this modified address is pasted in the address box of any web browser, the full sized image will be retrieved. A nice workaround for this problem is to simply resize your images before uploading them to your blog. A great free image resizer/converter is Mihov Image Resizer. To resize in Image Resizer, install and open the program. Next select the file type tab at the top of the page (probably JPG). Then enter the desired picture size in the Pixels box to the right (the large setting in blogger is 400 pixels) and select your picture quality (I always select "Better Quality"). Next, in the box on the upper left, browse to the folder containing the images to be resized and select the image file or files to be resized. Then press the resize button and Image Resizer will place a resized copy of your picture in the same folder as the original. The new file name will begin with the prefix "mini-". A screenshot of IR is included below. Note the mini version of the picture in the images list on the left, indicating that the picture awesome.JPG has been resized.
 Simply upload the mini picture instead of the full-sized picture (before modifying the code to disable the link). The result is a small picture for everyone, including those super snoopy types.

